Did you know you can easily print your own receipts at home? Whether you need a replacement for a lost receipt, a fun custom design, or just want to print your own for personal use, it’s simple and efficient with the right tools. In this guide, we’ll show you how to use ExpenseFAST.co, DocDesk.co, and MakeReceipt.com to create professional-looking receipts and print them using a thermal printer. Check out our video below for a step-by-step demonstration, or read on to learn more!
🧾 Why Print Receipts at Home?
Printing receipts at home has never been easier. Here are a few reasons why you might want to print your own:
- Quick Replacement: Lost a receipt and need a replacement? No problem.
- Custom Designs: Create unique receipts for personal use or fun projects.
- Professional Finish: Using a thermal printer gives your receipts the same look and feel as those from retail stores and restaurants.
With tools like ExpenseFAST, you can choose from hundreds of customizable templates, tweak the details to fit your needs, and print them on real receipt paper.
🌐 Explore the Best Receipt Generators Online
Let’s take a quick look at the best web tools for generating receipts:
- ExpenseFAST.co: This website offers a vast collection of receipt templates for every need, including restaurants, gas stations, and retail stores. The user-friendly editor lets you quickly customize the details, add logos, and download your receipt image in seconds.
- DocDesk.co: Known for its powerful editing features, DocDesk.co gives you flexibility to design detailed receipts. With a wide range of templates, you can create receipts for everything from car rentals to grocery stores.
- MakeReceipt.com: This site offers both a web platform and a mobile app, making it easy to create receipts on the go. It’s perfect for users who want a quick, seamless experience from their smartphone.
🔧 What is a Thermal Receipt Printer?
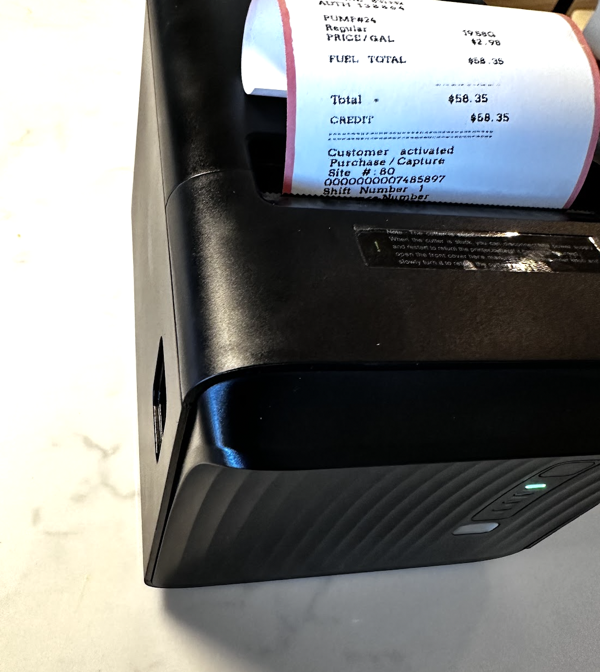
A thermal receipt printer is the only way to reliably print receipts on real receipt paper. These printers use heat to create text and images, meaning there’s no need for ink or toner. The print head heats the thermal paper to create clear, sharp receipts quickly and efficiently.

Thermal receipt printers are widely used in retail, hospitality, and business settings because of their speed and reliability. You can find many options on Amazon, with popular brands including Epson, Star Micronics, and Rongta.
For this guide, we’ll be using a Rongta 80mm USB Thermal Receipt Printer, but nearly any thermal printer will work with these steps.
📋 Step-by-Step Guide: Generate and Print Your Own Receipt
Step 1: Create Your Custom Receipt
Head over to ExpenseFAST.co and browse the templates. Pick a design that fits your needs — whether it’s for a restaurant, gas station, or store purchase. Use the editor to customize the details, such as the date, items, and prices. Once you’re happy with your receipt, download the image to your computer.
Step 2: Set Up Your Thermal Printer
- Connect the Printer: Plug the thermal receipt printer into your computer using the USB cable.
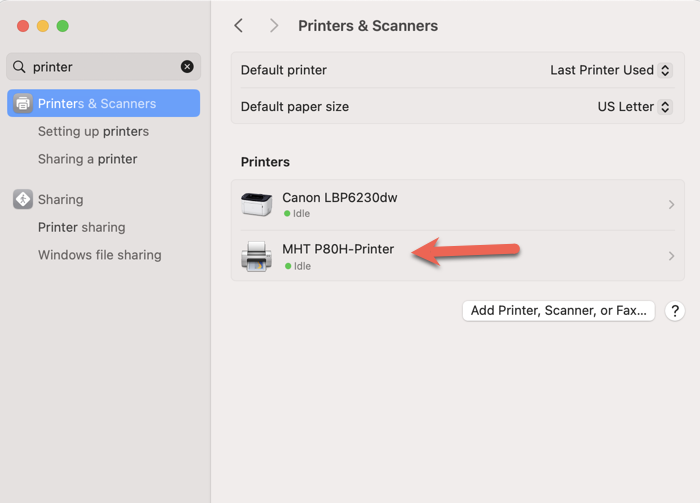
- Install the Driver: Download and install the driver for your printer. For our demo, we used the Rongta POS Printer, but the process is similar for most models.
- Set as Default Printer: After installing the driver, set the thermal printer as your default printer in your system settings.

Step 3: Print the Receipt Image
Now that your printer is ready, it’s time to print:
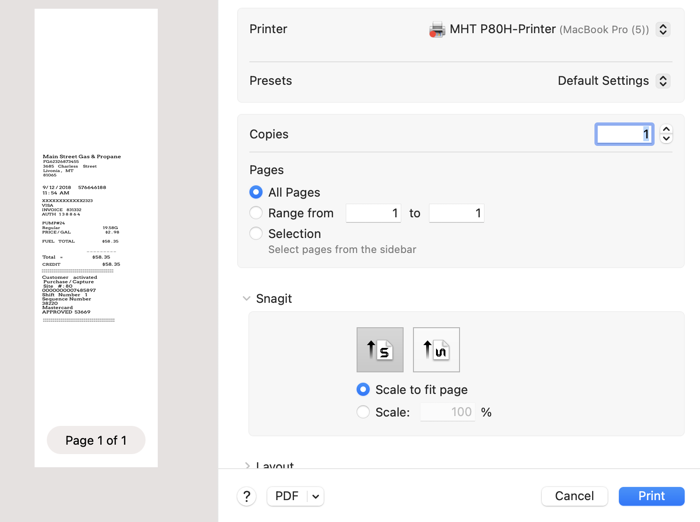
- Mac Users: Open the receipt image in Preview, go to File > Print, select your thermal printer, and adjust the paper size to match the 80mm thermal paper roll.
- Windows Users: Open the image in Photos, Paint, or your preferred image viewer. Click Print, choose the thermal printer, and adjust the settings for paper size and scaling.

Click Print, and watch as your custom receipt is printed onto the thermal paper. It’s fast, easy, and gives you a professional-looking result. Some printers even come with an automatic cutter that neatly trims the receipt for you.
🎥 Watch Our Video Tutorial
For a full walkthrough, check out our video below! We show you how to create a receipt using ExpenseFAST, set up the thermal printer, and print your receipt step by step.
💡 Tips for the Best Printing Experience
- Use High-Quality Thermal Paper: The quality of the paper can affect the clarity of the print. Invest in good thermal paper for the best results.
- Test Your Settings: Before printing multiple copies, do a test print to ensure everything is aligned correctly.
- Try Bluetooth Printers: In our next guide, we’ll show you how to print receipts using a Bluetooth thermal printer, which allows for even more flexibility.
🏠 Conclusion: Printing Receipts at Home Made Easy
With tools like ExpenseFAST, DocDesk, and MakeReceipt, you can generate any receipt you need and print it on real receipt paper from the comfort of your home. Whether you need a replacement receipt or want to have some fun creating custom designs, it’s simple, fast, and professional.
Ready to get started? Visit ExpenseFAST today and try it out for yourself. Happy printing!
